
Well, maybe more than one. . .

I have mentioned before that my father was a man of many talents and many interests. If you’ve read “What the Doctor Ordered”, you’ve seen (part of) his collection of antique bottles. As with the bottles, I have also become the custodian of his coin collection.

Lest I be misunderstood, this is not the whole collection. But today we will focus on a small portion of the pennies he found with his metal detector over the years.

When we were kids, our dad bought a metal detector kit. If I remember right, it was a “Heathkit” that you put together by yourself.

This is a screenshot from eBay, but it gives you the idea. It was advertised as a “Vintage 1973” Heathkit metal locator assembly manual. I’m not sure how I feel about 1973 being considered vintage, but anyway. I do think it’s safe to say I have the manual for my dad’s metal detector around here somewhere. We used to like seeing the coins and other items he would find at the park, around Little League field, or outside the snack bar after high school football games. Sometimes he was even called upon to find a ring or other important treasure that someone had lost in the grass.
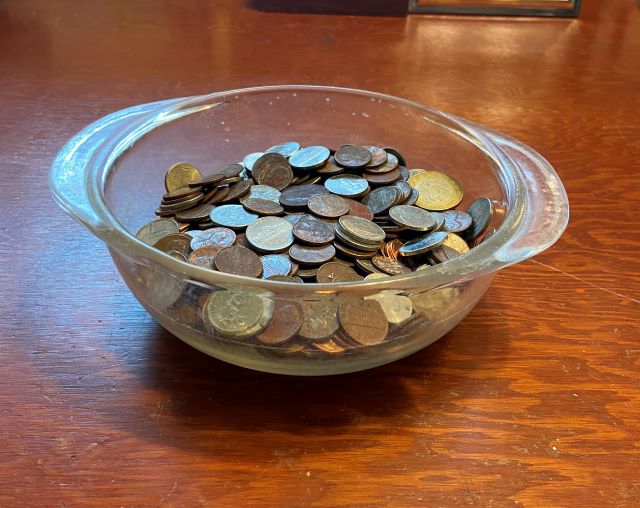
Naturally Daddy saved everything he found, carefully tucked away in drawstring bags, and he even rolled and labeled some of the coins, as you saw in the first two photos above. Fast forward to 2021, and you now have a daughter who’s trying to think of a creative way to display some of them.

Before you panic, yes, I did look on Pinterest, and no, I’m not going to make a floor out of them. Mind you, that’s not to say I don’t have enough pennies to do it if I wanted to. And, contrary to popular belief, it’s not illegal to make crafts out of US currency. I looked it up. What you can’t do it deface coins for the purpose of fraud, like changing a penny to look like a dime and trying to spend it. You also can’t melt coins down to sell for the metal. So, once satisfied that I wouldn’t end up in jail for it, I decided to make a small penny project.

I read up on it and found that you should wash your pennies first. Plain old dish soap worked for me.

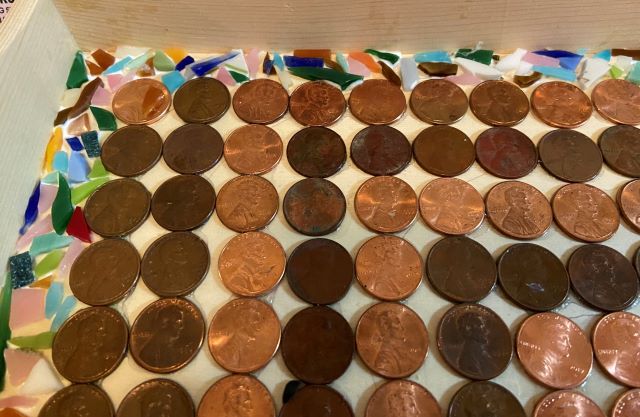
The next thing was to dry them off and sort them by color so I could make a pattern. It was then that I realized there were more than just pennies in this particular stash.

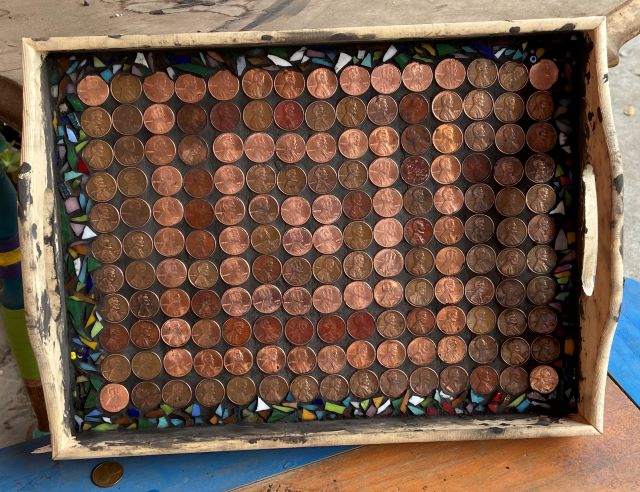
Here they are all sorted by shininess and color. I also made sure there were no really old ones that might be worth more than, say, a dollar, mixed in.

Since I just happened to have a wooden tray lying around, I started with that. As you can tell by the pencil lines, I originally thought it would be cool to make a spiral. I immediately thought better of it and went for a more traditional “quilt square” type of design.

You can kind of see the pattern, but it’s more noticeable from a distance, and also depends on the light. I used Weldbond glue, which is what I would use for any ordinary mosaic, and it seemed to work.


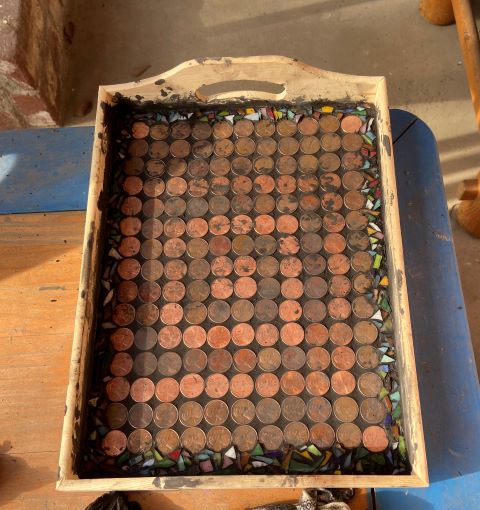
Obviously there needed to be a border around the edges of the design. I experimented with several ideas, but none of them really “clicked” for me.

Then I got the idea to try something really different. You may want to refer to “Why Teachers Shouldn’t Be Mosaic Artists”, for info on why I even have a jar full of glass pieces this small. I decided to spread glue on the tray and sprinkle these tiny glass pieces on like glitter.
After spreading the pieces out as best I could, I felt I’d met with some degree of success.

When everything was dry, it was time to think about the grouting process.

I had read that it was a good idea to use non-sanded grout so as not to scratch the pennies. This made sense, although I do have a sort of “hate-hate” relationship with non-sanded grout, which you will remember if you’ve seen “The Amazing Chocolate Mosaic Vase”. Still, since I had so much of it left over from that project, I went ahead and jumped in with both feet. Figuratively speaking.

This was definitely a job to be done outside.

I know you’re supposed to wear gloves, but they will just tear, and you’ll get grout on your hands anyway. But if you don’t, your hands will look about like this for at least three days, no matter how much you try to wash them. So, if you decide to try this project, you’ll have to make your own decision on that.
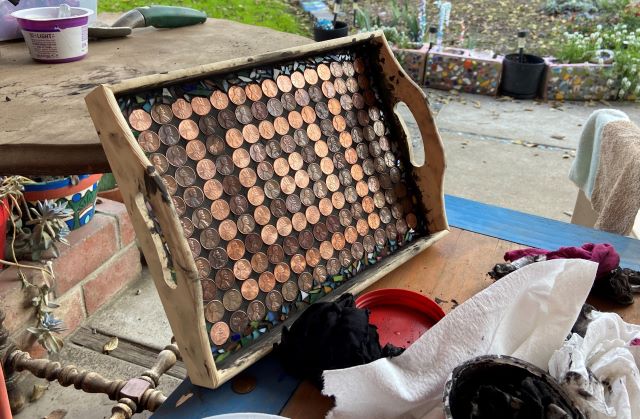
I kind of like the way the glass pieces look in contrast to the black grout. It reminds me of confetti somehow.

It was a little harder grouting such small pieces though. Some of them pulled off during the process. Figuring they were so small anyway, I didn’t attempt to glue them back or replace them. You can also see how much grout I got on the edges of the tray, which would later have to be scraped off.
Almost done!
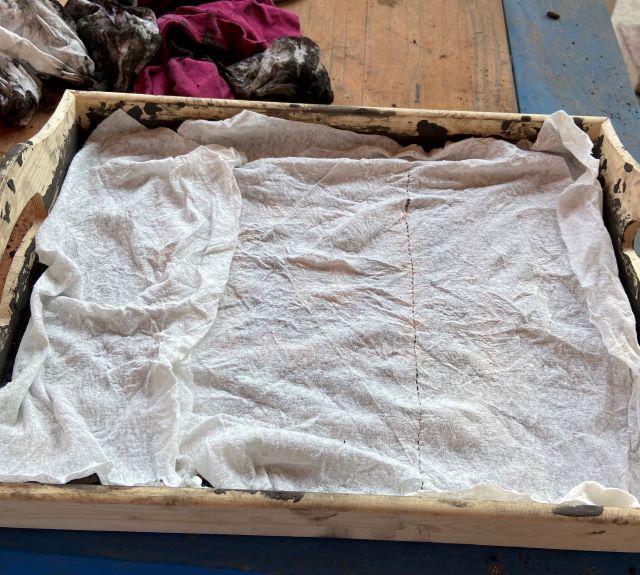
I’d read that grout dries best when it’s kept moist, which to me seems like a contradiction in terms, but then again, that’s why I’m a language teacher and not a scientist. I placed some moist paper towels on top of it and left it outside for a few hours.
There could be a little grout on some of the pennies, but this is as good as it was going to get. It was time to go inside and paint the tray.

With these trays, I never know whether to paint first or grout first. I think it really comes down to “six of one, half a dozen of the other”.

The paint still needs to be sprayed with a clear acrylic coat, and I have to figure out whether or not I’m brave enough to put resin over the pennies or just spray them, too. I’ve never used resin, and some of what I’ve read sounds pretty daunting. All the mixing and measuring and curing and not breathing the fumes and everything else sounds a little much, even for someone as “Big Girl” as I am.

I won’t lie and say I didn’t order a small amount of resin mix from Amazon, but I’m also not locking myself in to the idea that I have to use it on this tray. It should be arriving any day. Until then, we’ll all have to wait for “Part 2″…

What a fun project!
Thanks! It was!
Here’s my 2 cents – very cool! 😄😄
Thanks! 😀
That is so cool!! Your creativity never stopped amazing me!
Aww! Thank you! ☺️
Flushed with the success of this project, are you sure you’re not tempted to tackle a tiny floor? 🤔Just kidding, Debra!
Lol don’t tempt me…🤣🤣
😁😉
Very creativ and I love it!
Yvon
Thanks! I’m glad you liked it! 😀
I did notice you had Lincoln’s head showing on each penny and all of them positioned the same. I doubt they did that to the penny bathroom floor.
Seriously! I can’t imagine being that meticulous either! 😂
I love it, You’re very creative,
Thanks Sandra! It was fun😀
Lulu: “Pennies for servin’!”
💰💰
The penny design came out nicely. Thanks for sharing the article.
Thanks! Glad you liked it 👍🏻