
So my neighbor was having this yard sale…
 I get the best stuff from my neighbors and their yard sales! So much so that I seriously have a folder of pictures on my computer, waiting to be made into a blog post about it. But for now, let’s just start with the glass vase.
 I actually spotted it from across the street, when I was opening my front blinds for the day. I knew it was only a matter of time before it would end up in my backyard. When they quoted me a price of $5, I knew it was meant to be. This was the vase I had been waiting for. Now that I was “experienced” at mosaic pots, I was ready to start a mosaic vase, and this was just the shape I had in mind.
 I washed it off and got it all ready to go. I didn’t really have a plan for how I wanted it to look. I’d just do random pieces of pottery and glass gems and figure it out from there.
 I started out with glass gems around the bottom.
  If you look closely you can see that they began slipping off. So I was already at “Plan B”.
 “Plan B” worked pretty well. I turned the vase right-side-up again and positioned square glass gems between the round ones to keep them from slipping off.
  It didn’t take long to discover that plain glass isn’t the best surface to glue things on, at least not if they are going to be vertical like this. I used craft paint to give the surface a little more texture.


 After a few days looked like this. It was now time to decide on the grout color.
 I looked at various photos of mosaic pots and decided that black, like you see in the Pinterest screen shot above, would be the best. I had used quite a few white and light colored pottery pieces and black sounded like a nice contrast. I remembered reading that non-sanded grout was best if you didn’t want your tiles to get scratched during the grouting process.


So off I went to “Carlos’s store” where they had both sanded and non-sanded grout in “charcoal”, which was the closest thing to black. The non-sanded was more expensive, and it also came in a much bigger box. I thought about getting the sanded, but opted for the non-sanded in the end. Just so you know, there is valuable information on the grout box that you probably should read carefully before getting started. Unless you’re me, in which case you just start your project and wonder why it’s not turning out the way you’d expected.
 While I was at the store I also picked up a nice sponge and some rubber gloves. This time I was going to do it right, and not make such a mess. Or so I thought.
 To begin with, the non-sanded grout was extremely sticky and gooey, unlike what I had been used to on my previous projects. It didn’t seem to cover as well as I had expected.
 But for being as sticky as it was, it didn’t stick well to the glass between the pottery and gems. Once I wiped off the excess grout it looked like this. (Which actually did look kind of cool, I must say.) Next I had to figure out how to fill in the empty strips.
  I tried making up smaller batches of grout and trying not to get any on top of the mosaic pieces. Gradually it was starting to get filled in. But it was taking forever…
 And then, for reasons unknown to me, pieces started falling off!
 Here’s another shot of the bottom with the gems coming off. And if you look carefully at the grout, it doesn’t seem to be very smooth.
  And then even more started to come off! Something was not working just right, but I couldn’t put my finger on the problem (no pun intended!) So I painstakingly glued the pieces back and put on more grout.


Gradually I got it almost completely covered. But it still just didn’t look right. I decided to start researching a little more. Eventually I figured it out. If you scroll back to the photo of the grout box, you will notice it says it’s for grout joints up to 1/8 inch. I discovered that with spaces as big as the ones on this project, you are supposed to use sanded grout. I guess the danger of your mosaic pieces being scratched is minimal after all.  So it was back to the hardware store. Even though they’d had both sanded and non-sanded in charcoal the first time, now they were out of the sanded. The man who helped me generously went to look for it in a couple of different places, and came back to say they were getting a shipment in on Thursday. Well, this was on Sunday. Do I really look like a person who wants to wait till Thursday to finish a project? (Truth in blogging: As it was, I had just come from Home Depot, where I couldn’t even find a parking spot, and that’s how I ended up at the store by my house. I wasn’t going anywhere else.) I examined the available colors and decided on “Nutmeg”, because it was the darkest choice.
 As soon as I started with the sanded “nutmeg” I was able to see a huge difference in the texture. I had looked up whether you could put new grout over existing grout, and it wasn’t necessarily recommended, but I figured I didn’t have much of a choice.
  It seemed to be working pretty well. I just had to not worry about the fact that some of the smaller pieces were going to be nearly obliterated by the second coating of grout. I just chalked it up to a “learning experience”.
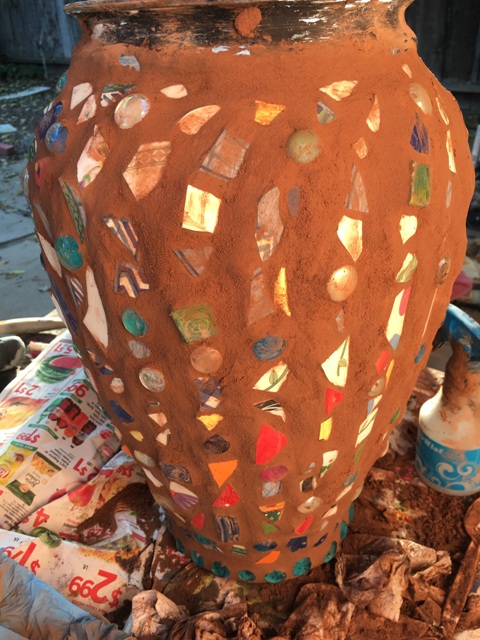
 I really liked the way this grout looked like chocolate. But I made the mistake of not wiping off all the residue in some areas and leaving it till the next day. It was then I discovered that if you leave it for too long, “nutmeg” is much harder to get off than the lighter grout colors.
So it was back to the drawing board (actually the iPhone) where I read that you could remove grout from tiles with vinegar. Well, it the process I got vinegar on the rest of the grout and it turned all powdery-looking. You’ll notice that I did the top rim last, and in this photo it hasn’t dried all the way. Here you can see the offending vinegar, as well as the gold colored gems that were given to me by the same neighbor who was having another yard sale. I decided to try using them on the rim, even though I knew the style didn’t really match. But I was curious to see how it would look.
 Not bad, I guess. I figured that after all I had done to this vase, there wasn’t much I could do to make it worse.


Finally, I sprayed it with grout sealer, and when it dried it was a little better. But it still looked a little powdery, which I didn’t like. So after the sealer was dry I sprayed it with clear gloss. (And no, I do not receive a commission from any of the products mentioned in this blog. In fact, I’m starting to think some of these companies would pay me a commission not to mention their products…) So there you have it, the amazing chocolate mosaic vase, newly sprayed with clear gloss. It looks like dark chocolate in this light, but it’s really more of a milk chocolate, as you see below.
