Okay so I really like geckos.
 Well, not the real ones, they might be a little slimy, or scaly, I’m not sure which. (By the way, I got this photo, as well as the featured image for this post, from Pixabay.com.)
 I like to draw geckos, especially “talavera style”.
 I even have a card with this design in my Zazzle store. (Click here to see the actual product.)
 Plus I used “gecko” for the letter G in my ABC Animals journal.
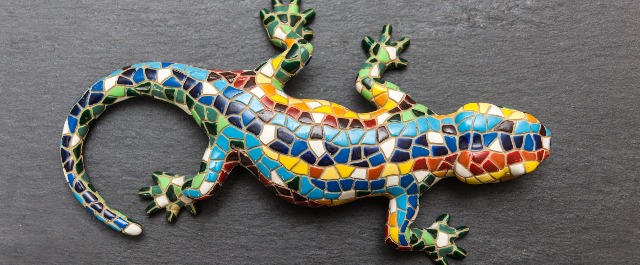
So when I began to notice things like this gecko mosaic on Pinterest, it follows that I would immediately think “I can make that!”  I figured it would be as easy as drawing the design and attaching tiles with glue, just like any of the other mosaics I’ve done.
 I might mention here that I later read that cardboard is not the best substrate for a mosaic. You really should use something more rigid, preferably a surface that can be sealed or waterproofed first. Water is the enemy of the mosaic, the article said.
  But this is how we learn. You will also notice another common “mosaic mistake”, and that is the mixture of different tile thicknesses. This can work, depending on the project, but apparently it wasn’t going to work on this one.
 Undaunted, I kept going. The green pieces are from a couple of coffee cups I had tried to cut in half, (which I later read you need a dremel tool for). You can see how they don’t lie flat, due to the fact that coffee cups are rounded in shape. More on that later, perhaps.
  Maybe it will look better once it’s grouted, I thought. I actually think the grout made it worse, but anyway.
 Okay I know what I did wrong. I should have made a more visible outline around the gecko. Ready for Plan B?


So far so good. But as you can see, I was still using a cardboard backing, although I did try to use all tiles of the same thickness. Originally I was going to use darker tiles to surround the design, but it looked to me like it wasn’t going to show up well. So I pulled them off and used lighter background tiles instead. I thought it was going to look nicer than the first one… When it was finished I put it on the chair in the sewing room to dry, next to its predecessor.
 I’ll use some of my non-sanded black grout for this, I thought. It’s not as if I don’t have enough of the stuff. For more info on non-sanded black grout, see “The Amazing Chocolate Mosaic Vase”.
  My initial (and current) reaction to my mosaic geckos has been “meh”…This one does kind of have a stained glass look to it, but I still have trouble really “seeing” the gecko. Both of them actually remind me of those patterns they make you look at to see if you are colorblind.


So now they are outside on the patio, where geckos are supposed to be anyway. I think maybe where I went wrong was drawing the designs on cardboard instead of using a piece of plywood already in the shape of a gecko.
But those aren’t that easy to come by.

Unless you have your own jigsaw, (which I might, in the garage…)
